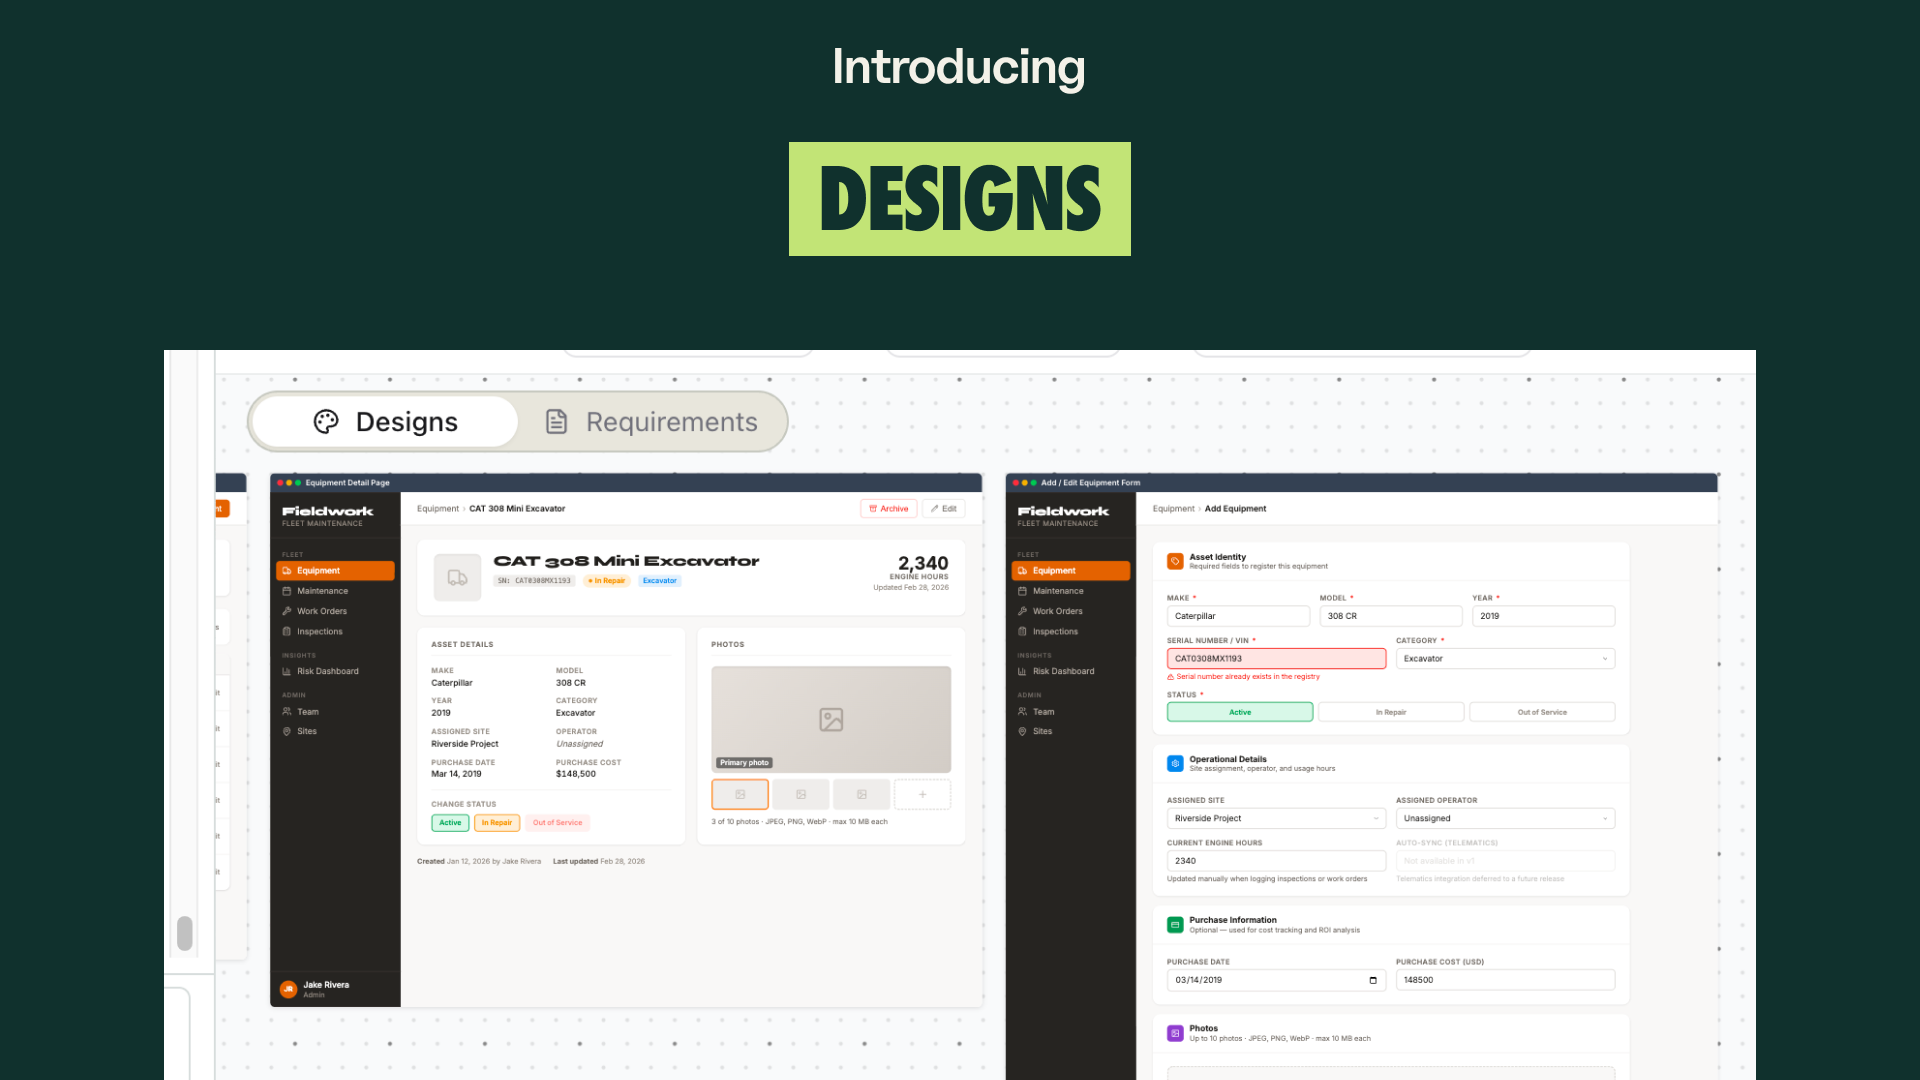
Introducing Designs: See what you are building before you build it
Create, iterate, and refine your app visuals from a prompt. Desktop and mobile views, chat-based iteration, annotations, and element selection -all tied to your requirements.

You planned it. You specified it. But do you actually know what it looks like?
Most builders skip the visual step. They go from requirements or plans straight to code. Then they spend days adjusting layouts, fixing flows, and rebuilding things that should have been caught earlier.
Some try. They paste a prompt into a design tool and get back the same thing everyone else gets. Default spacing. Safe grays. A layout that could be any app. It looks "AI-generated" -and both you and your users can tell.
The gap between "what I described" and "what got built" is where time disappears. So does the gap between "close enough" and "this looks right."
Today, we are introducing Designs -a new way to visualize your app before you build it.
#What's New
Designs creates visual boards from your requirements. Start with a prompt, get a design. Iterate until it matches what you have in your head. Then build with confidence.
The output looks like it came from a product designer, not a prompt. Real typographic hierarchy. Intentional spacing. Color systems that hold together across screens.
Five capabilities, one goal: close the gap between planning and building.
-
Prompt-to-design Describe what you want and the design agent creates it. Tied directly to your requirements.
-
Desktop and mobile views See your app across screen sizes before writing a line of code.
-
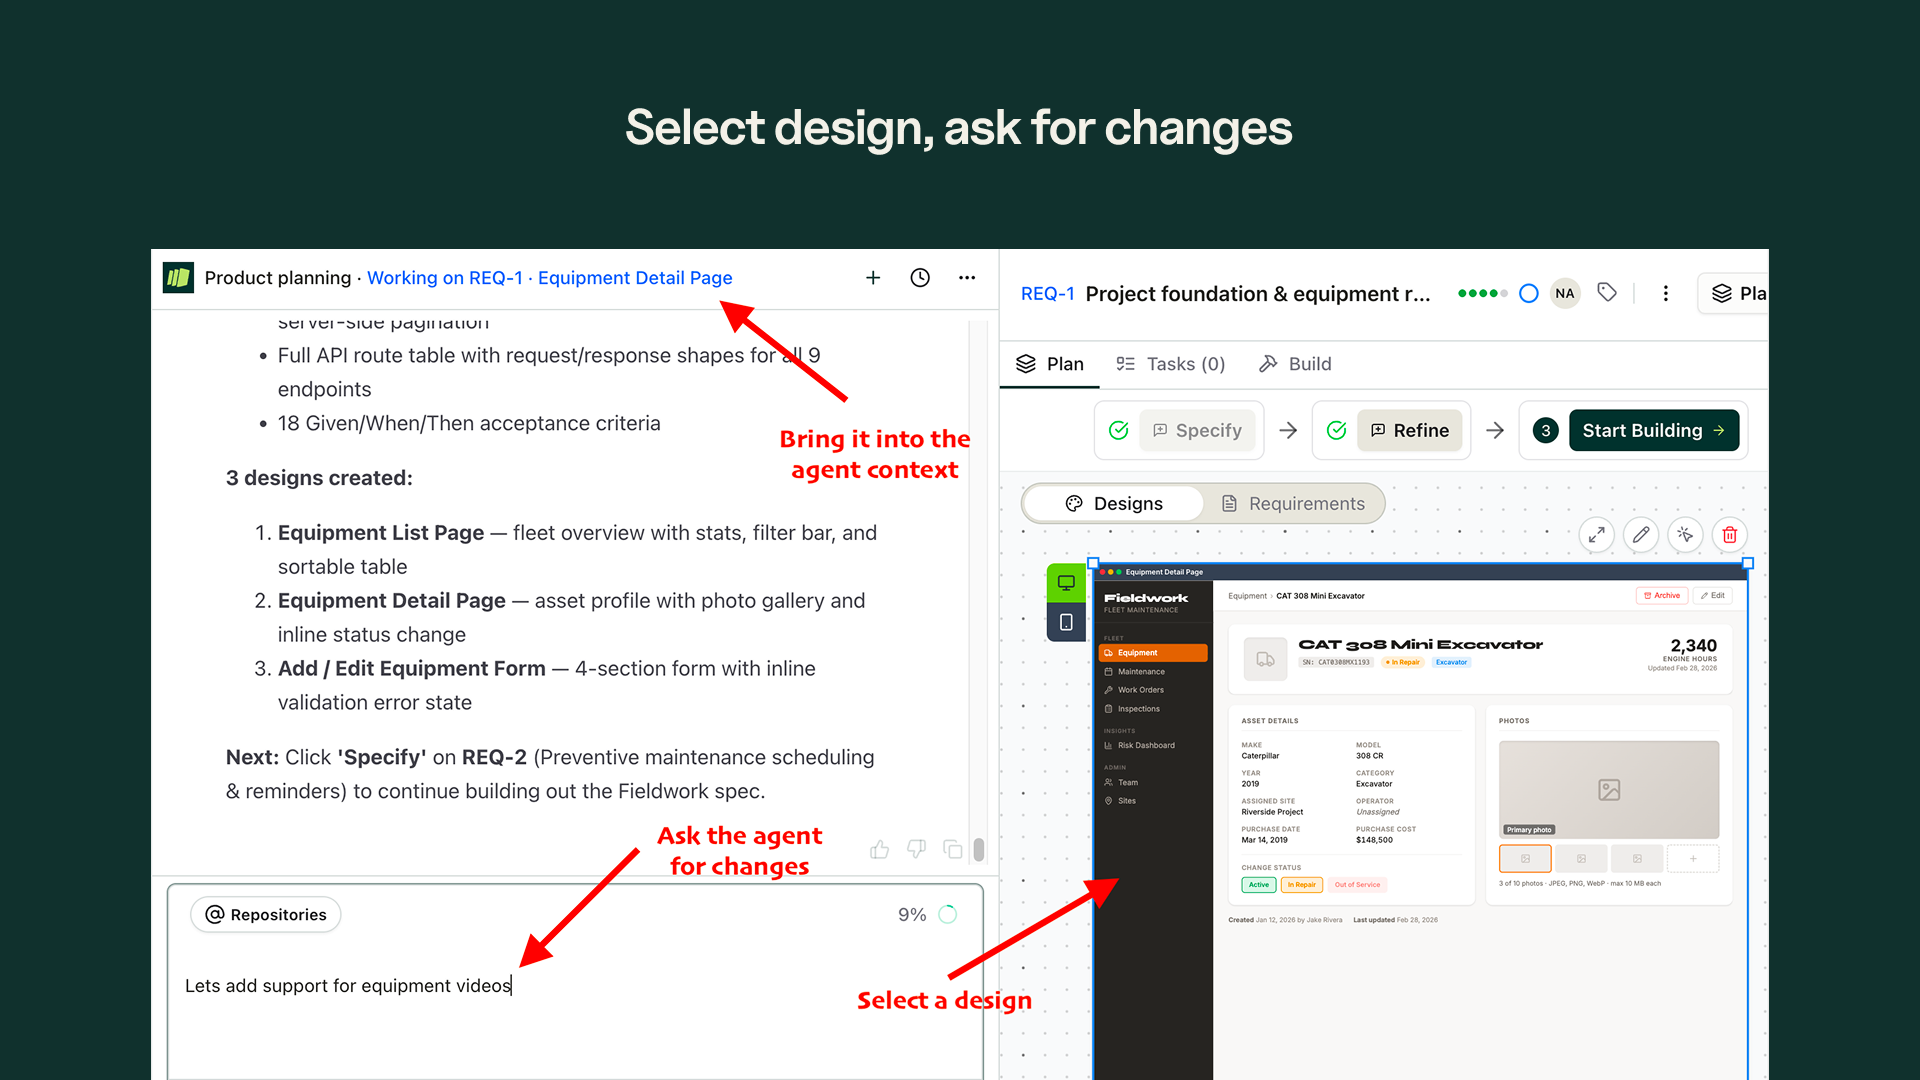
Chat-based iteration Talk to the design agent to refine direction, try alternatives, and get it right.
-
Annotations Select parts of the design that need to change. The agent sees exactly what you mean.
-
Element selection Pick individual components and send them to the agent for targeted changes.
#Why We Built It
Builders kept running into the same problem.
"I described exactly what I wanted. The coding agent built something functional, but it didn't look or feel like what I had in mind."
Functional is the easy part. The hard part is the space between elements feeling right. Headings that establish hierarchy instead of just being bigger. A color palette that communicates something instead of defaulting to gray-on-white. Details that signal "someone designed this" -even when no one did.
Text descriptions lose nuance. A button in the wrong place, a layout that doesn't flow, a mobile view that was never considered -these are the things that turn a clean build into rounds of rework.
We built Designs so you can see what you are shipping before you ship it -and so what you see actually looks like something you would ship.
#How It Works
#1. Start from a prompt
Describe what you want. The design agent creates a visual from your prompt, tied directly to the requirement you are working on.
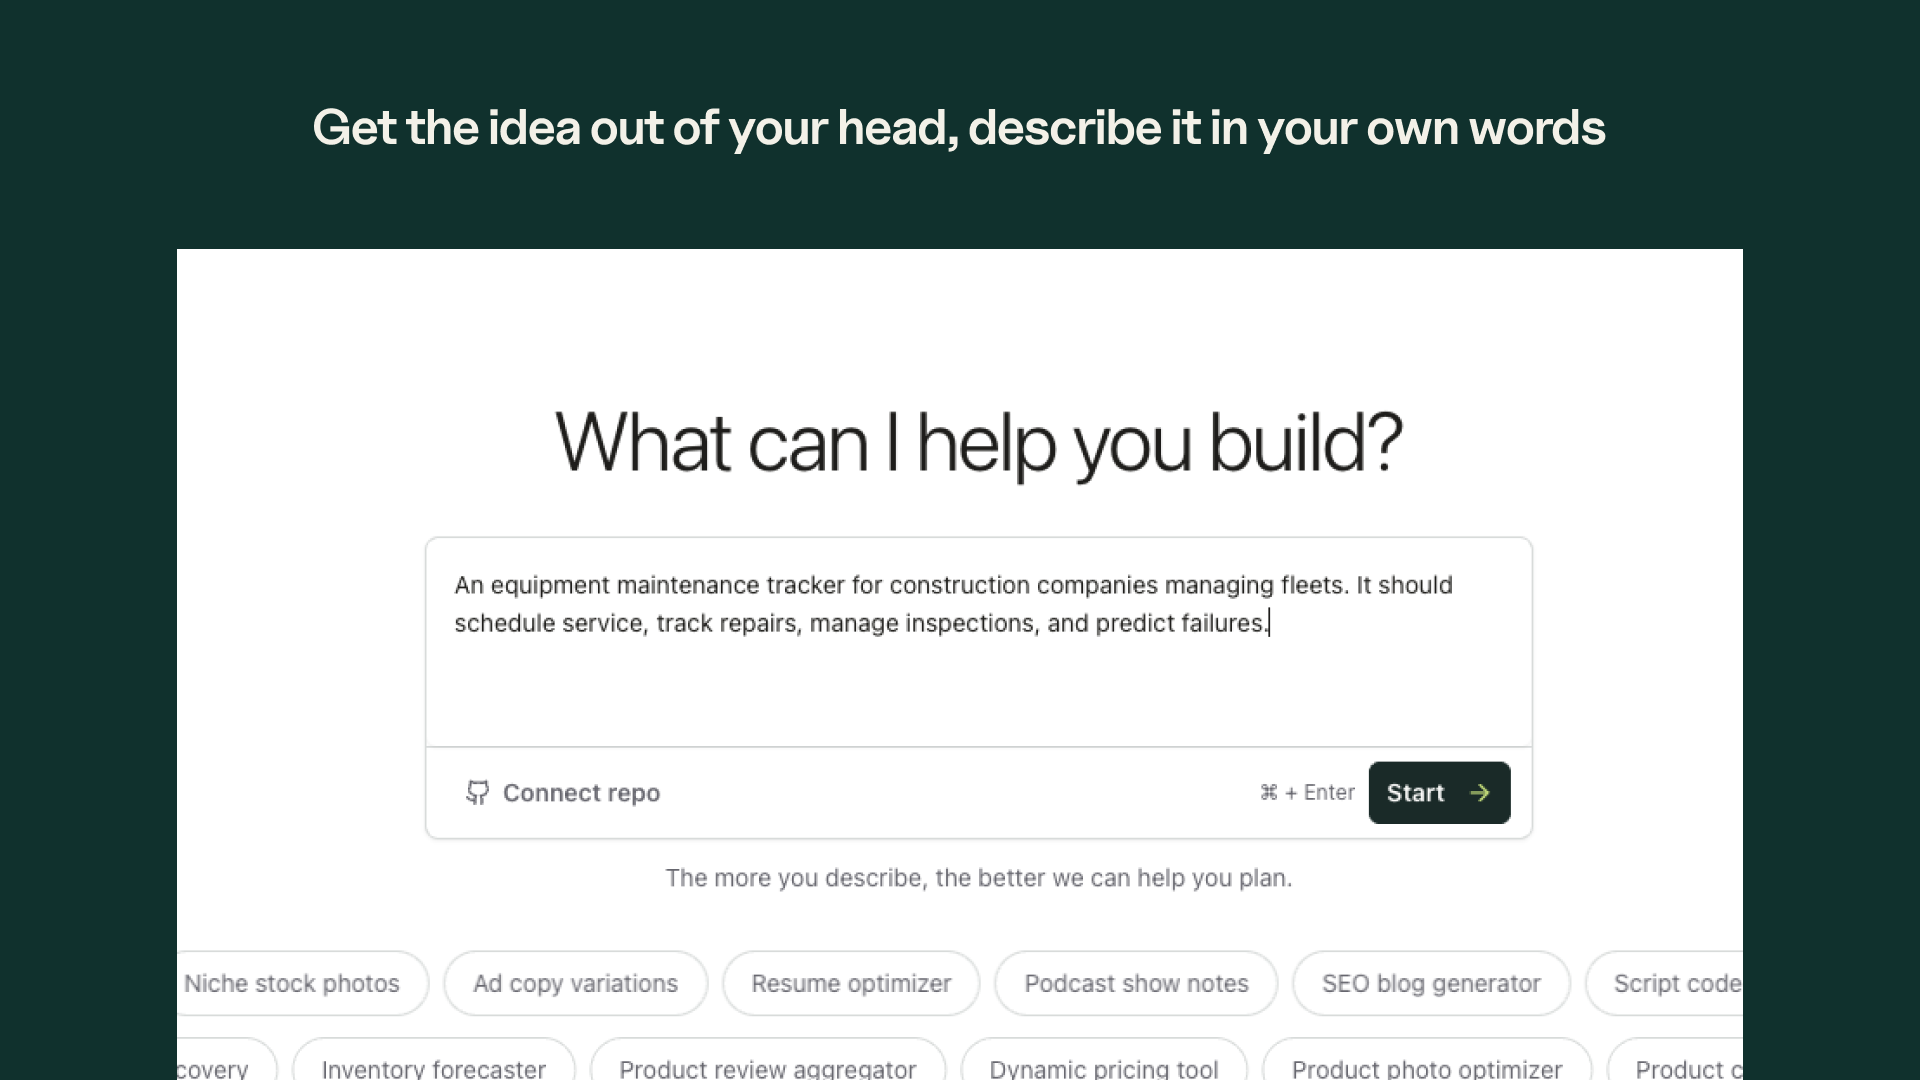
You can start broad ("dashboard with analytics charts and a sidebar") or specific ("settings page with toggle switches for notifications, grouped by category"). The agent works with whatever you give it.
#2. View desktop and mobile
Switch between desktop and mobile boards to see how your design works at different screen sizes.
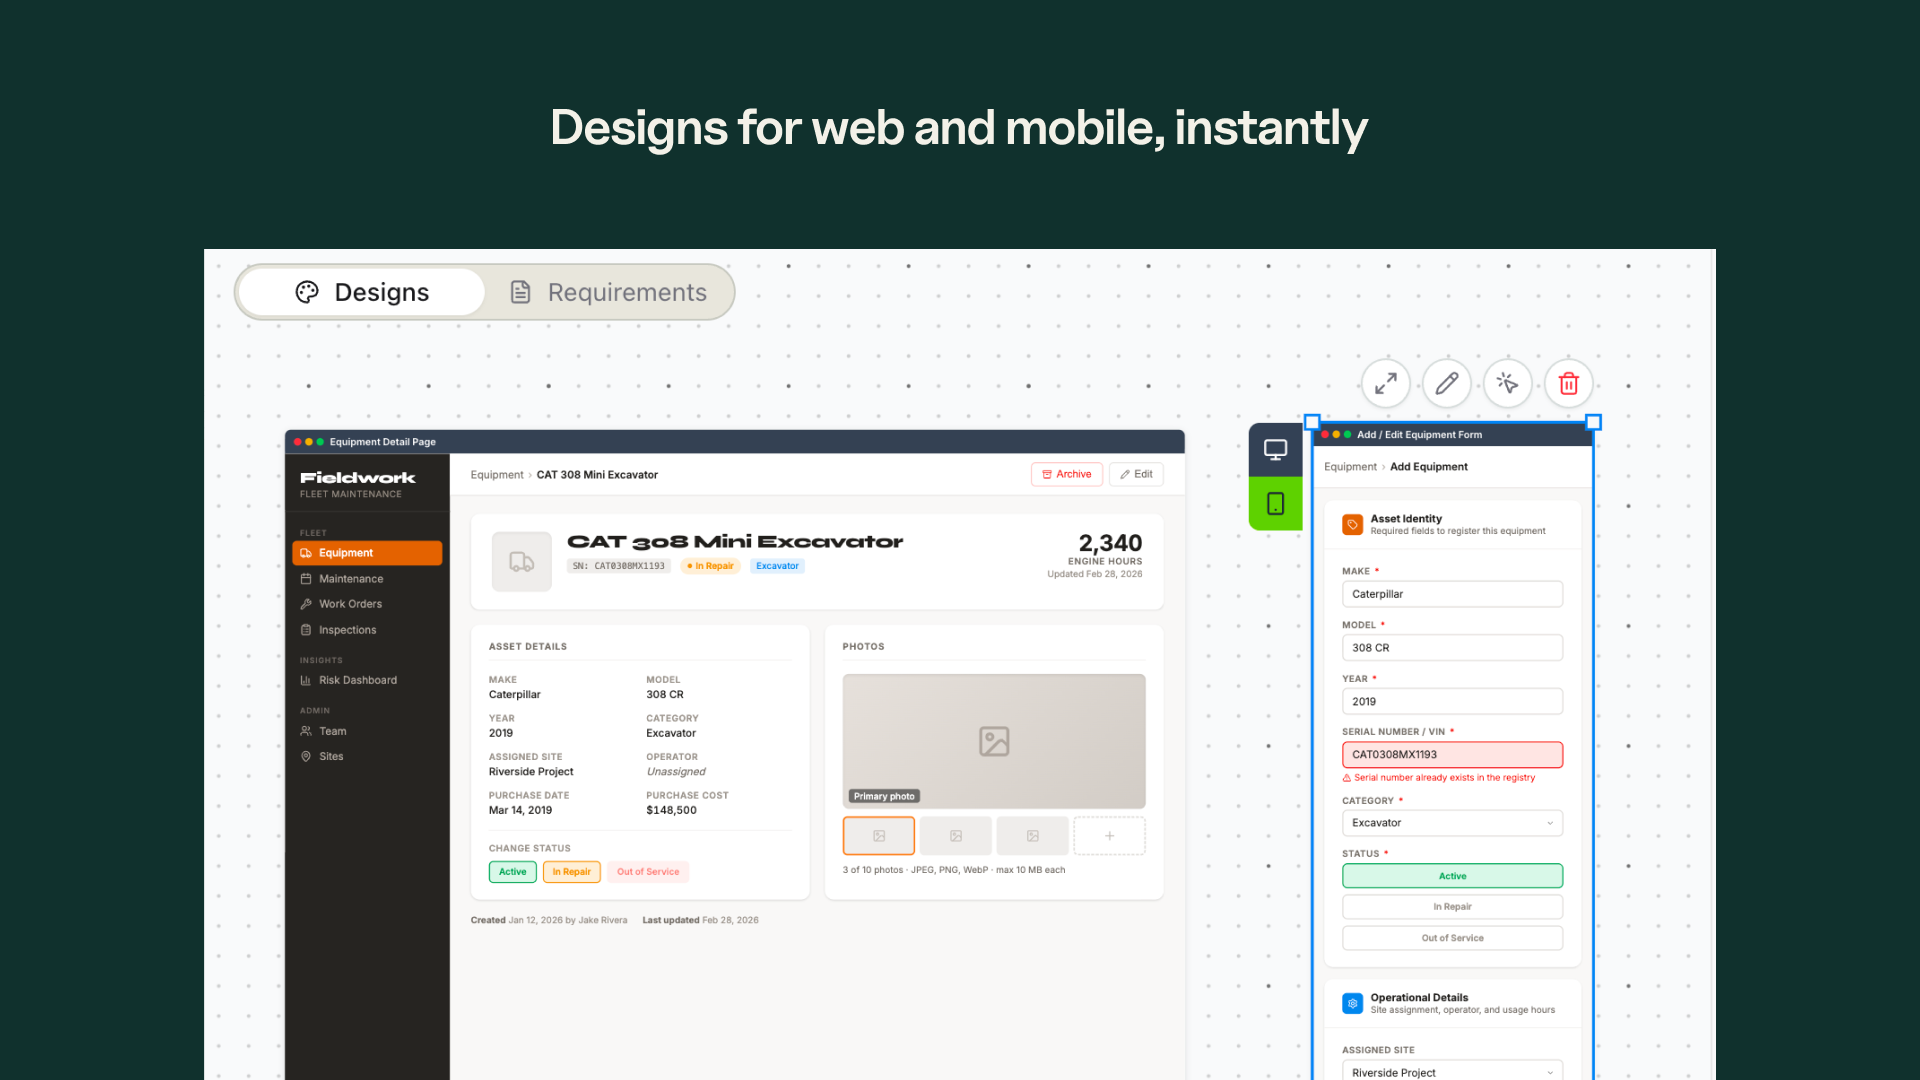
No surprises when you go to build. Both views are there from the start.
#3. Iterate by chatting
Talk to the design agent the same way you would talk to a designer. Ask it to move things around, try a different layout, change the color scheme, or add a section.
The agent keeps the full context of your requirement and previous iterations. Each change builds on the last.
#4. Annotate what needs to change
Sometimes it is easier to point than to describe. Select parts of the design you want to change. Draw annotations, highlight areas, or circle elements.
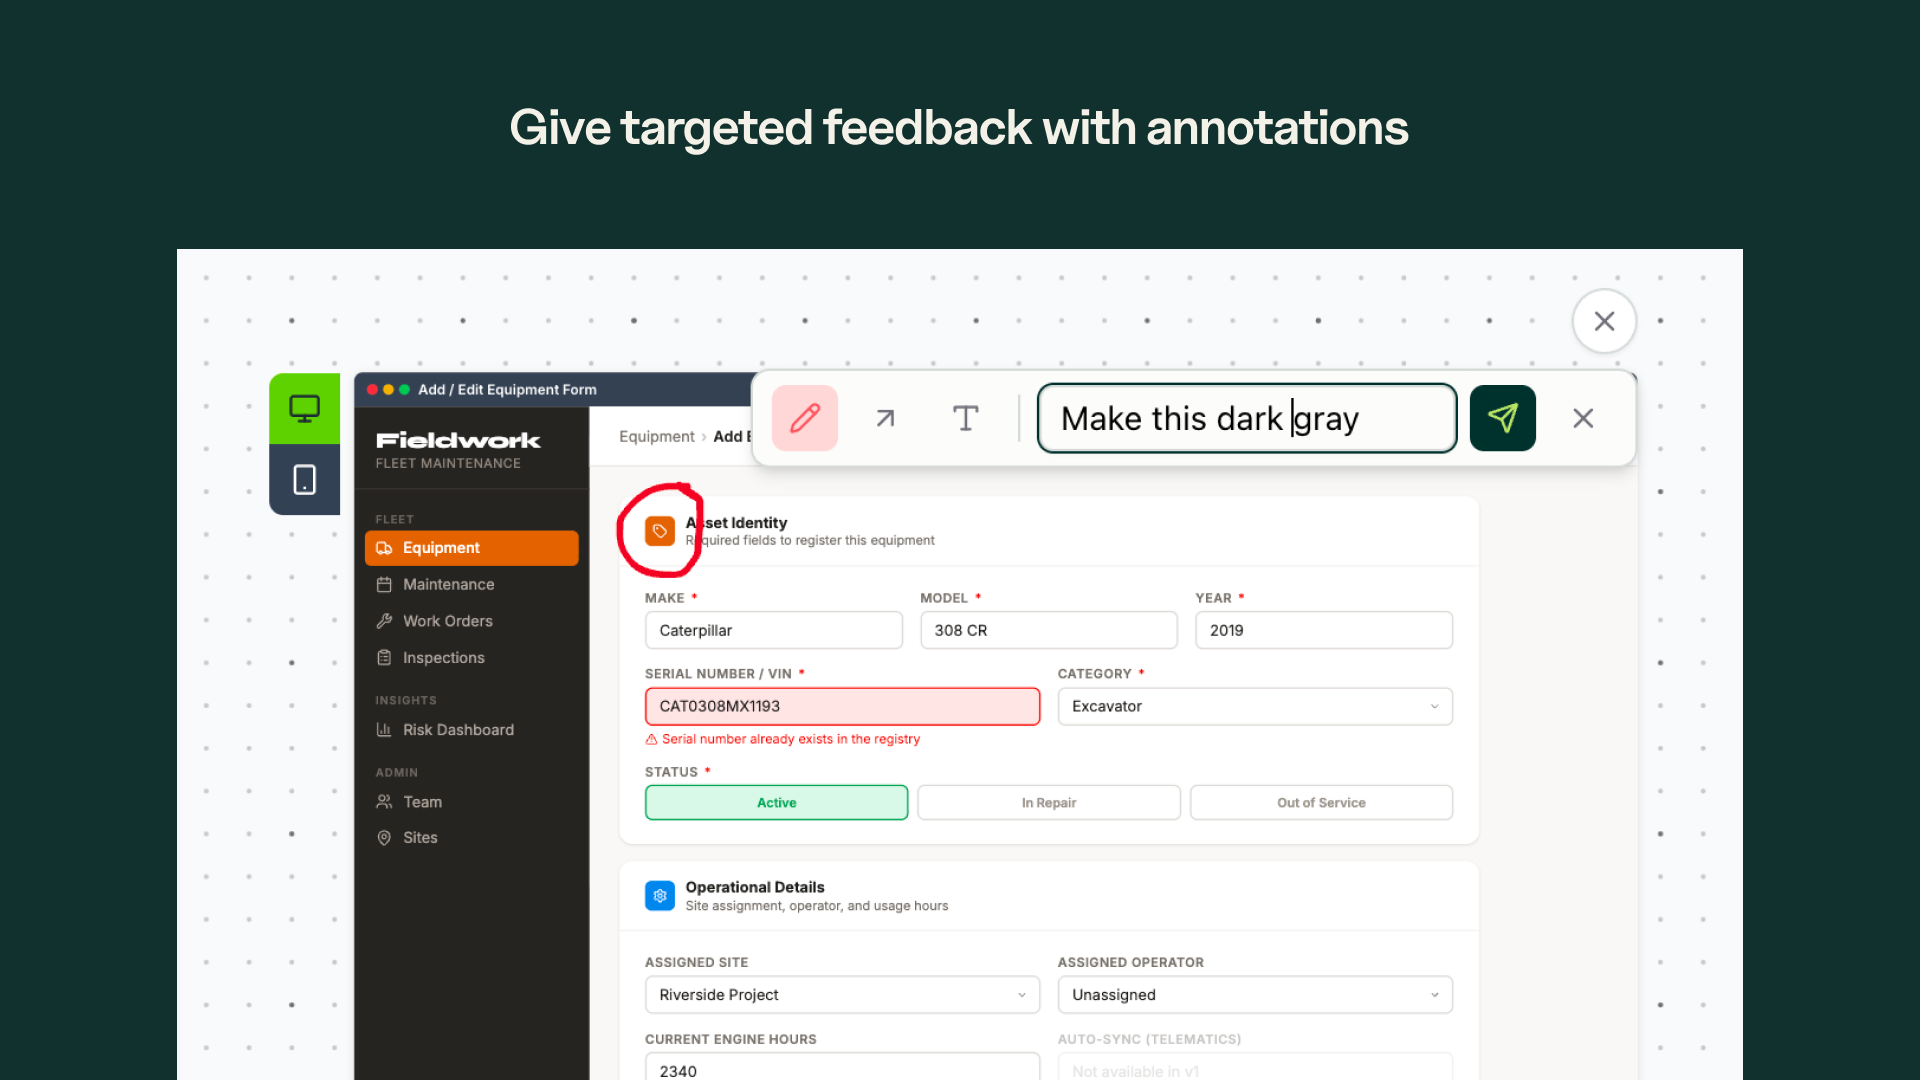
The annotations go as screenshots to the agent. It sees exactly what you are pointing at and makes targeted changes.
#5. Select individual elements
For precision edits, pick a single element from the design. The agent receives that element with full context and makes the change without touching the rest.
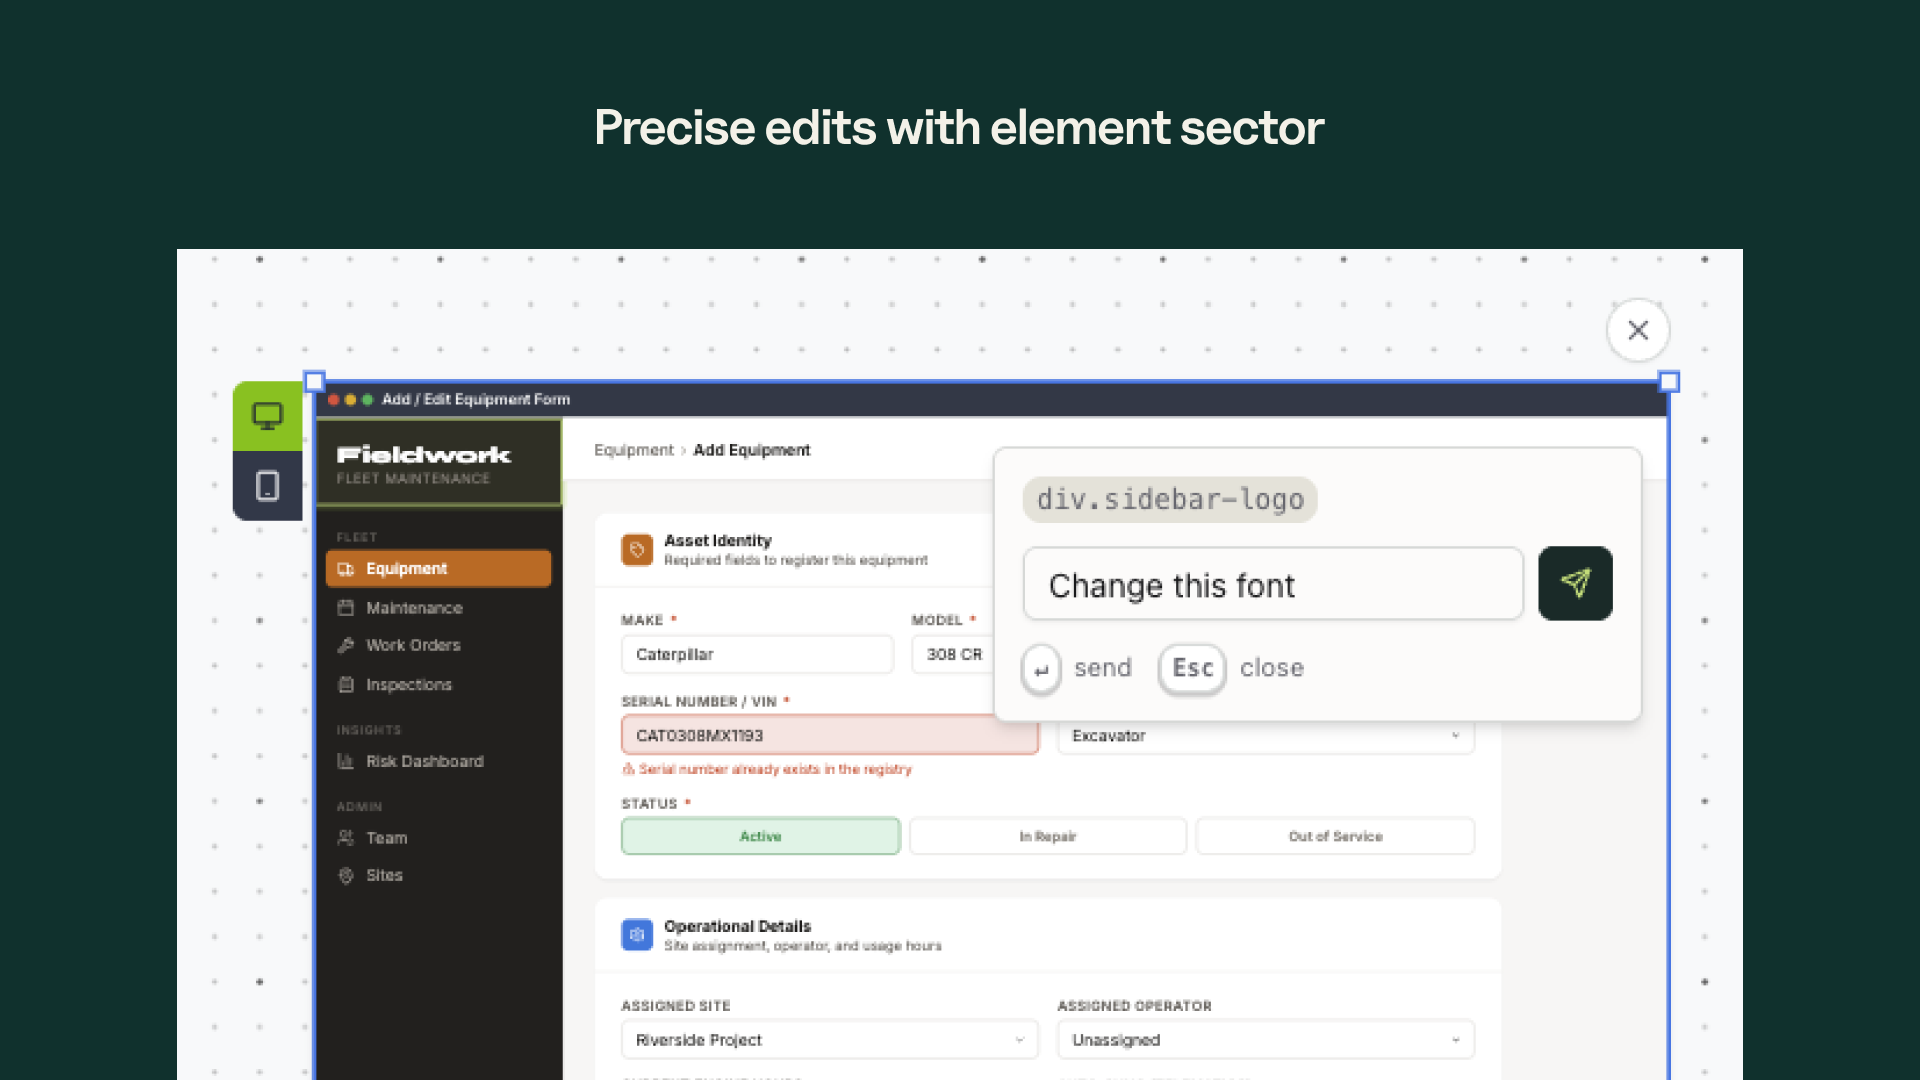
This is the fastest way to fine-tune specific parts of your design.
#From idea to visual to code
A typical workflow looks like this:
- Plan your project and specify requirements
- Create a design from the requirement
- Switch between desktop and mobile views
- Iterate by chatting, annotating, or selecting elements
- Once the design matches your vision, build with your coding agent
Your coding agent gets both the specification and the visual reference. Less ambiguity. Fewer rework cycles.
The visual reference matters more than most builders realize. When your code agent receives a design with clear hierarchy, consistent spacing, and a real color system, it produces frontend code that reflects those decisions. The design becomes the quality bar. Not a wireframe to interpret. Not a mood board to approximate. A reference precise enough that the code comes back looking like the design.
For solo builders and small teams, this closes a gap that used to require a designer on staff. Not because AI replaces design thinking -but because the design step now produces output worth building from.
#Get Started
Designs is available now for all BrainGrid builders.
Pick a requirement, create a design, and see what you are building before you build it.
About the Author
Nico Acosta is the Co-founder & CEO of BrainGrid, where we're building the future of AI-assisted software development. With over 20 years of experience in Product Management building developer platforms at companies like Twilio and AWS, Nico focuses on building platforms at scale that developers trust.
Want to discuss AI coding workflows or share your experiences? Find me on X or connect on LinkedIn.
Keep Reading


Ready to build without the back-and-forth?
Turn messy thoughts into engineering-grade prompts that coding agents can nail the first time.
Re-love coding with AI